It was a 2000 point per side game of Epic Armageddon, between an army of my own creation, the Heavy Mechanised Imperial Guard, and the squats of Thurgrimm's Stronghold.

The Heavy Mechanised Imperial Guard list uses Macharius chassis heavy tanks, such as the Macharius, Macharius Omega (above), Praetor Assault Launcher and Crassus Heavy Transport. I have tried (and am still trying) to make it so that it is a mix of resilient heavy tank formations, and heavy transports with firefighting infantry that get thrown at the enemy. The downside is limited mobility in the key hitting units, and a lack of Deathstrikes.
The list that I took didn't have any Crassus, for a couple of reasons (I am half way through changing them, and I haven't got any painted ones), but had plenty of other Macharius chassis.
Here are the Quartermaster Output files for the Armies that we took.
| The Squat Killers (Heavy Mechanised Imperial Guard) | 1,975 points | |
| Core Formations | 725 points (37%) | |
Heavy Mechanised Infantry Company (400)
| Commander (Autocannon); 12× Infantry (Autocannon); Chimera x7 (Multi Laser; Heavy Bolter); Commissar (Power Weapon) | |
Heavy Tank Platoon (325)
| Macharius Command Tank (Vulcan Mega-Bolter; 2× Heavy Bolter; Twin Heavy Stubber); 2× Macharius Tank (2× Battlecannon; 2× Heavy Bolter; Twin Heavy Stubber); Commissar(Power Weapon) | |
| Support Formations | 975 points (49%) | |
Superheavy Artillery Battery(450)
| 3× Praetor Assault Launcher (Heavy Assault Launcher; 2× Heavy Bolter); Commissar(Power Weapon) | |
Omega Heavy Tank Platoon(400)
| 3× Macharius Omega (Plasma Blastgun; 2× Heavy Bolter); Commissar (Power Weapon) | |
Salamander Scout Platoon(125)
| 3× Salamander Scout Vehicle (Heavy Bolter; Autocannon); Salamander Command Vehicle (Heavy Bolter; Autocannon) | |
| Other Formations | 275 points (14%) | |
Warhound Titan (275)
| Warhound Class Titan (Plasma Blastgun; Turbo-Laser Destructor) | |
So only six activations in 2000 points, which is pretty low. But I knew the squats would have plenty of expensive war engines, and would probably have a similar number of activations. I also didn't take any fliers, as my opponent is only learning Epic Armageddon after a lifetime of Epic and we haven't introduced them into our games yet.
Here are some pictures of some of the units listed above. I haven't got one of the salamanders squadron, as I just used proxies (hydra's without the AA guns on them).
Red Platoon have been given the nod as my infantry contingent this game. This is an older picture and I didn't take the sentinels. I took chimeras for transports.

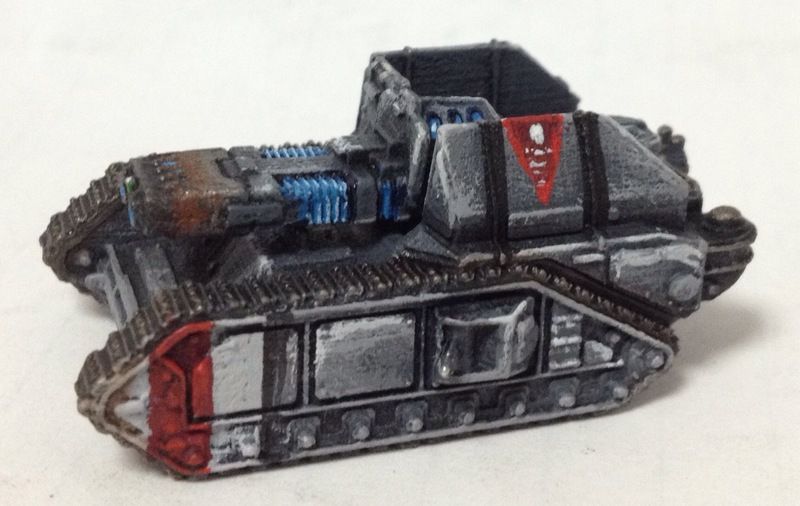
I seem to be missing any pictures of my Macharius Squadron. This one showing my vehicle damage and blast markers is the best close-up I have at the moment. I'll need to do something about that. Just imagine that there's three of these, with the command one having a vulcan mega-bolter.

Superheavy Artillery Battery. Three Praetors ready to unleash squat killing death from afar.These were my Break Their Spirit formation, so would give up a victory point if killed; making them an even higher priority target.
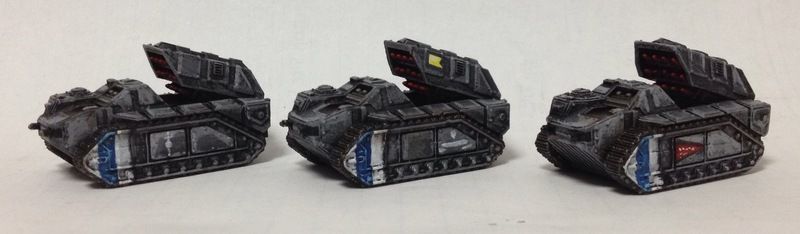
The Omega squadron were shown above in the first picture of the post, but here is a closer picture of one of them. The plasma blastguns are my best bet at taking down the super tough Squat war engines.
The Legio Ignatum Warhound Titan Praedetor would be tasked with holding a flank on it's own, and threatening the enemy back field. As well as killing scary things, and generally trying to prop up the rest of my army.

The Squats list was something like this.
| Thurgrimm's Stronghold | 2,075 points | |
| Core Formations | 625 points (30%) | |
Warrior Brotherhood (300)
| Hearthguard (Heirloom Weapons); 9× Warriors (Missile Launcher; Lasguns) | |
Thunderers (150)
| 4× Thunderers (Missile Launcher; Heavy Bolter Squad) | |
Transports
| 7× Rhino (Stormbolter) | |
Berserker Brotherhood (175)
| Hearthguard (Heirloom Weapons); 5× Berserkers (Trench Pistols) | |
Transports
| 3× Rhino (Stormbolter) | |
| Support Formations | 700 points (34%) | |
Overlord Formation (250)
| Overlord Airship (6× Battlecannon; 4× Overlord Autocannons; Flak Cannons; Bomb Rack; Small Bolter Array; Overlord Designator) | |
Bikers Guild (225)
| Guildmaster (Power Lance); 4× Guild Bike (Bolt Pistols); 3× Guild Trike (Multi Melta) | |
Bikers Guild (225)
| Guildmaster (Power Lance); 4× Guild Bike (Bolt Pistols); 3× Guild Trike (Multi Melta) | |
| Other Formations | 750 points (36%) | |
Goliath Formation (300)
| 2× Goliath Mega Cannon (Goliath Cannon) | |
Colossus (450)
| Colossus (Doomsday Cannon; 4× Colossus Battlecannon; Thunderer; 4× Plasma Missiles; Colossus Bolter Array) | |
Ignoring the fact that it is slightly over points (only 75), and that the war engines section is more than a third of the army (we don't get too bogged down in little details like this in our normal games) the Squat army has a few tough nuts. In an Epic Armageddon army building oversight, there are two Break Their Spirit formations, in the Warriors and the Colossus (both 450 points). This meant that I could choose which unit I wanted to try and kill with extreme prejudice to gain a victory point. I decided to pick on the Warriors, as I thought they would probably be the easier one for me to deal with.
The Gulid Bikers with their mobility and multi-meltas would be problematic for my war engine heavy, non-thick rear armoured, relatively unscreened list, and the Goliaths are a pretty nasty artillery unit that are comparable to my Praetor unit. It is quite rare for the Praetors to be on equal footing with enemy artillery, as they usually win the artillery war in the first turn and support the advance from turn 2 onwards.
The Colossus has plenty of firepower too, and the doomsday cannon can fire indirectly thanks to the spotting Overlord Airship. The Overlord is no slouch either, with six(!) battle cannons, giving this single model as much firepower as my Macharius squadron (which is no easybeat in the firepower department).
We set the table up as shown below, rolled for sides (we both have the same strategy rating) and placed objectives. The Imperial Guard were on the left edge, and the Squats on the right.
The Blitz objectives were placed behind the craters on either edge of the board. The Squat's take and hold objectives were placed in the left most buildings, and the edge of the left forest.
The Imperial Guard take and hold objectives were the bunker on the edge of the big hill in the foreground (close to the buildings), and in the crater at the far end of the table (which is camouflaged and pretty hard to see).

I took this photo at the start of deployment, so you can just see the Salamanders garrisoning behind the left most buildings, and the first of the Squat units deployed (the Goliaths).
From top to bottom on the Imperial Guard edge we have the Infantry Company (in their chimeras! Very gutsy move with the Goliaths directly opposite; no, I don't know why I did it either), the Macharius Omegas behind the crater securing the Blitz, the Macharius tanks between the craters and the forest, and the Praetors and Warhound behind the wood.
On the Squat edge from top to bottom are the Berserkers in rhinos (behind one of the tall rocks), a Biker Guild in front of the Goliaths, The Overlord Airship above the crater, the Warriors in rhinos in front of the Colossus, and the other Biker Guild on top of the hill.

The Imperial Guard won the roll for turn one, and the opening salvo was from the Praetors, who bombarded both the Warriors in their rhinos and the Colossus with the same barrage. The Colossus lost a couple of void shields, but the Warriors took a hammering, losing rhinos and embarked infantry.
In return the Goliath's opened fire on the Praetors, damaging and suppressing one.
The Omegas doubled forward through the dangerous terrain for no loss (phew!) and fired at the Goliaths, damaging one. I only used one dice from each blastgun (as I was doubling and I reasoned that I wouldn't waste all six dice with the -1 to hit), but in hindsight that was a mistake. I should have thrown everything I had at the Goliaths when I had the chance.
The Colossus fired on the Omegas, killing one and breaking them.
The Infantry Company doubled into the crater, with the infantry in cover, and the chimeras hugging the crater behind them. Those in range fired on the nearest Biker Guild, taking a few down.
The Berserkers doubled forward into the crater as well, facing off against the Infantry Company. Whoever got the drop next turn would be initiating the engagement, probably with support from something nearby.
The Salamanders advanced on the Berserkers, ready to support the infantry in the coming engagement.
The Warriors marshaled forward (retaining a small compliment of blast markers) into the buildings preparing to secure the take and hold objective next turn.
The Praedetor advanced to the front of the wood and shot at the warriors, taking out some of their rhinos in an attempt to slow them down.
The Macharius tanks failed to activate, and moved forward. This was a bit of a blow as I was counting on them to hammer the warriors, break them and secure the centre. I really missed not having a supreme commander crutch!
The Guild Bikers doubled forward and stripped some shields from the Warhound.
The Overlord punished the Salamanders for attempting to set up support for next turn's engagement so early, wiping them out. So the Infantry Company wouldn't be having any support in next turn's engagement.
In the end phase the Warriors and the Bikers failed to rally.
So the Squats were well positioned at the end of turn one, with the Omegas unlikely to be able to support the Infantry Company in the upcoming engagement. The infantry outnumbered the berserkers though, so it was still looking like a close call unless something dramatic happened.
End of Turn 1. Note the well defined and highly numerous Squat front line moving towards the outnumbered guardsmen. Hopefully they were coming to surrender.


No pictures from this point forward unfortunately. At least I remembered for one turn!
Turn two. The Squats win the strategy roll and elect to go first...
After a small discussion on the pro's and con's of retaining the initiative, the Overlord immediately unleashes it's entire arsenal (apart from the flak, but I'm sure that took a pot-shot too) on the Infantry Company, targeting their chimeras and destroying most of them. The Berserkers successfully retain the initiative (bugger), and engage the battered guardsmen. Some casualties on either side result in both formations ending the fight at the same size, with the Berserkers having the advantage of no blast markers. After the dice roll they win the combat by four, and the guardsmen break and fall back. The Berserkers dig in and secure the Imperial Guard take and hold objective.
The Omegas double forward and shoot at the Goliaths with their single attack dice. It hits, causes one damage on the already damaged gun, destroying it. The remaining Goliath breaks, falling back to the blitz objective.
The Biker Guild shoots at the Warhound Titan, breaking it and securing the take and hold objective.
The Macharius tanks advance and shoot at the warriors. More damage is caused, and they break.
The Colossus promptly targets the Macharius tanks, killing the command tank breaking them, forcing them back from the Squats Take and Hold objective in the buildings.
The other Biker Guild advances, securing the take and hold objective, and shoots the Omegas, breaking them.
The Imperial Guard army was running out of unbroken formations, and had nothing much that was fast enough to be able to threaten the Squat's half of the board. We were also getting short on time, so we ended up calling it at the end of turn two.
The Squats had secured Take and Hold and They Shall Not Pass, with their BTS formation heavily mauled but not destroyed, and Hold the Line a given for the Squats next turn. So a 2-0 victory to the squats at the end of turn 2, with 3-1 the likely result had we played the third.
Some overall thoughts on the game:
- The Squats bring a nice mix of heavy hitters, fast macro weapons in the bikers, and capable engagement troops in the Berserkers (in small numbers, but they do okay provided they are supported). Target selection is tricky. I needed to take out the Goliaths and Overlord early, maul the bikers before they caused me too much trouble in my back field, and then focus on the warriors and berserkers, probably completely ignoring the Colossus. All the while advancing to threaten objectives. I need more practice to be able to pull all that off!
- The Overlord has a formidable damage output for a single model with six battle cannons and four autocannons (plus built in air defence!). I'm lucky there was only one, it will be targeted with extreme prejudice next game! Personally I think it would be better with three battlecannons with an all around fire arc, consistent with similar "model to rule" conversion examples in Epic Armageddon.
- The Heavy Mechanised list has lots of units that I consider "must have's" (or rather "I really really want to take's"), so trying to shoehorn them all into a 2000 point list left the activation count fairly low. Only being able to take two support choices per company limits things further. If I want artillery and macro weapons (which I need against an army like the squats), that doesn't leave a lot of points left over for activation count as I need to take two core units totaling about 700-800 points (which isn't as much of an issue in a 3000 point game, but makes it tough in 2000 point games given my "must have" support options are about that much as well).
- The Praetors fire six barrage points and have six damage capacity for 450 points, while the Goliaths fire six barrage points and have four damage capacity for 300 points. At first I thought the point difference was well in favour of the Squats, but on reflection I think these values seem about right to me, especially when you add a free fearless commissar leader to one of the Praetors. The fact that they are faster is neither here nor there in my opinion. It might be worth reducing the Praetors to two for 300, with the option of adding another (for 150), to add a little flexibility to the list.
- The Omegas are another expensive support unit. Making them a two-to-three option might be worthwhile trialing too.
- The Salamanders are proving hard for me to source. I think I will change the scout unit to sentinels (both because I have them, and it doesn't seem out of character for a slower tank army like this as the sentinels can keep pace with the heavy tanks).
Otherwise I am fairly happy with how the army "feels", with each activation being quite important and quite decisive. This makes a supreme commander all the more important, as you don't want to be failing to activate if you can help it.
So we will have a re-match next week. I'm going to try a few different things to see how they go.
I'll try to remember to take more pictures!
No comments:
Post a Comment